
This weekend I participated in a blog hop, and I featured a couple things I wanted to go into more detail with. This is one of them. You have probably seen Spinner cards and even made a few in your time. There are a few ways to make these, and I used 2 different ways on the hop cards. This is the Wide Slot with Double Layer method.

- Stamps: Happy Hour
- Ink: Crisp Cantaloupe, Calypso Coral
- Paper: Whisper White, Soft Suede, Crisp Cantaloupe, Coaster Board
- Other: Itty Bitty Shapes punch pack circle, ½" Circle punch, ¾" Circle punch, paper trimmer, 1-3/8" Circle punch, Big Shot with Modern Mosaic embossing folder, Signo white gel pen, Rhinestones Basic Jewels, dimensionals

So this is what I started with in addition to the white card base. I did try with 2 coaster board ¾" circles, but the back circle was too thick to slide well. Not sure why, it slide well with the acorn card. Maybe the die compressed the layers more. But anyhoo! And I used three 3/8" circles to make up some space from the double layers of the front panel.


Now you will want to lay this piece on top of the mat and trace the slot onto the mat, then repeat the cut and punch process. It is ok if this slot ends up bigger as the top layer will cover it. When you glue the pieces together, make sure to run adhesive along the edges of the slot so they stay good and stuck together.
You will also want to lay this assembled panel on top of the card base and trace the slot with a pencil. Then you can stamp your sentiment where the slot will be. Just be sure to erase the pencil line after your ink dries :)

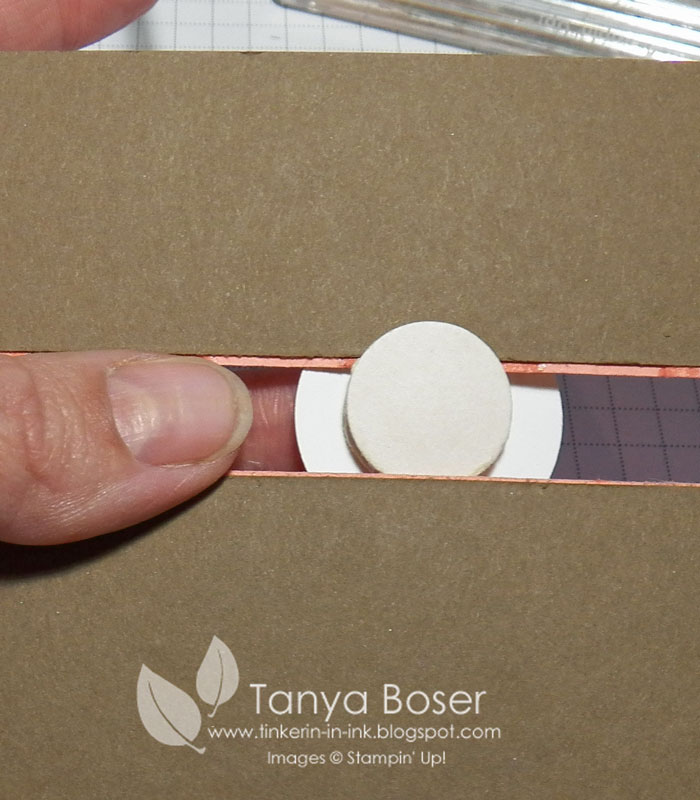
To attach your spinner image to the card front panel, slide one side in....

Then gently push the bottom edge of the slot away from you as you slip the bottom edge of the spinner circle over the bottom slot edge. I promise, it will fit and your card will look lovely :)

Now that you have you spinner attached, you can tell where the circle will slide. I recommend going overboard on the dimensionals for this card, especially around the slot. You just want to make sure you don't block the spinner mechanism. You also don't want the front panel to squish down and prevent the spinner from spinning :)
Now you can stick this puppy to the card base! I would love to see yours too, feel free to post a link to your in a comment below. I also love to hear your hints and how well this tutorial worked for you. Don't be shy, we all love to share :)
- Stamps: Happy Hour
- Ink: Crisp Cantaloupe, Strawberry Slush
- Paper: Whisper White, Soft Suede, Crisp Cantaloupe., Coaster Board
- Other: Signo white gel pen, dimensioinals, Rhinestone Basic Jewels, Circle Punches: 1-3/8", 3/4", 1/2", and 3/8", Big Shot with Modern Mosaic embossing folder, paper trimmer
4 comments:
This is such a cute card! Thanks for the detailed instructions on how you made it!
I love spinner cards, and this one is a super fun one. Thanks for sharing your creativity with us.
Great tutorial! I love that you showed the two ways to do this card in the hop.
I think this card is perfect! Thanks for the details!
Post a Comment